 January 2 2015
 Converting an N Scale CMX Cleaner Car to HOn3
Here are pictures and discussion shared with us from one of our customers who is a CMX user, of how he modified his N scale CMX to HOn3.
I, like many others, have spent much time and gone to great lengths looking for the ultimate in track cleaners. For many, it still remains elusive and subject to personal choice and whims. I did not want a track cleaning car to be a total eyesore so it...if found....would have to be able to blend within the confines of my railroad and its story.
After trying many different methods and cleaners...looking at the pros and cons of every imaginable cleaning car, I settled finally on the CMX machine. I was impressed from the start and went the normal route of purchasing the recommended car...an HO scale unit to be adapted down to my scale...HOn3. I model in HOn3 with small Shays doing all the work. I purchased the HO scale Clean Machine with a package of Centerline HOn3 adapters. The car felt heavy... it was...really heavy! So much so, that three of my Shays together could barely move it on the flats and when it came to my grades...well...any movement if any was imperceptible. So back to the drawing board I went. I traded the HO scale car for a N scale CMX Clean Machine to adapt up to HOn3 while still using the Centerline HOn3 adapters. What follows is the fairly easy conversion of my 'brass bomb' to operating rolling stock status.
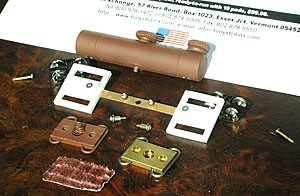
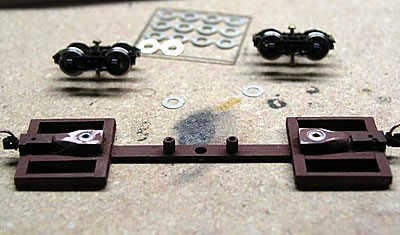
Picture #1 shows the original frame with the Centerline adapters installed. Grandt Line archbar trucks, the beginning of styrene end platforms and the extra brass pad which was to be used in conjunction with the original pad (to make a 'Pad' sandwich for weight and track alignment).
Picture 2.

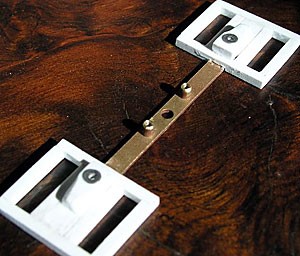
Picture #2 shows a closer image of #1 with the longer pad screws and homemade brass bushing to allow for the pad to reach all the way to the rails. By doing this the spring didn't have to be stretched. Because HOn3 is quite a bit larger than N, many of the original working measurements had to be modified...the pad assembly and drawbars are two.
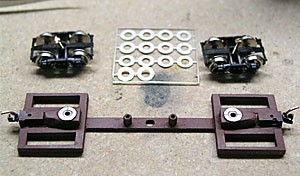
Picture 3.
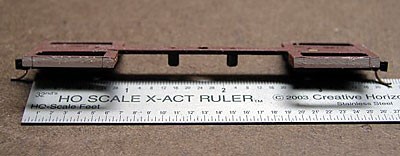
Picture #3 shows the completed frame with Centerline adapters trimmed to allow the trucks to swivel
freely. The bolster holes have been drilled to allow the bolster screws (lengthened) to screw into the tank as originally designed. Two 2-56 stainless washers were heated into the styrene at the holes to provide a solid level support for the truck bolsters.
The whole frame was then given a light spray of a flat brown primer. Couplers were added and initial assembly to test for clearances was done. Car was disassembled to fine tune various operating clearances on the car. The styrene was now stressed with sand paper to give it a wood grain feel...picture #4.
Picture 4.
Picture #5 shows bolster washer ready to reinstall with Proto 87 E-Z RIDER TM 3 POINT TRUCK SUSPENSION UNITS. Bolster washers are set in permanently with ACC and leveled...Photo #6, and in Photo #7, the E-Z Riders are also installed.
Picture 5.

Picture 6.
Picture 7.
In picture #8, the trucks have been mounted and the car is together ready to be detailed. Wood decking, Brake wheel, staff and ratchet assembly were added as well as NBW's, brake hoses, stake pockets, stakes and grab irons.
Picture 8.

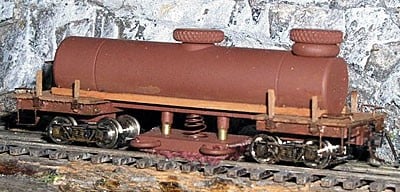
Pictures #9 and #10 shows completed model ready for a light weathering with an airbrush.
Picture 9.

Picture 10.
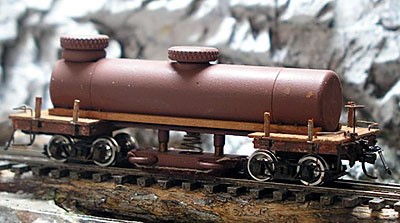
Inside the tank I am using a product from Aero-Car Hobby Lubricants called ACT-6006 Track and Rail Cleaner which cleans and leaves a non-slippery conductive coating on the rails. It doesn't react with any of the styrene components in this car as I have built it...aggressive cleaners could easily eat up the styrene, paint and detail items that were installed. The final car used only one pad and a stretched out a pad spring. Easier to pull with small engines but still has the weight to clean well. Thanks Tony’ for all your input.